In this video I demonstrate how to make a button activate a motion path. Then I export the document as a "Flash Player (SWF)" file to test the button. Buttons are useful in slide presentations.
Saturday, November 6, 2010
Thursday, November 4, 2010
king_ID tip
Here is my tip
Command 5 your screen goes to 50%
Command 1 your work is at 100%
Command 2 is 200%
command 4 is 400%
To easily move your screen to the image you want to work on alt/option+space bar and Bob's your uncle, momentary hand tool.
Back to 50% and good night!
Command 5 your screen goes to 50%
Command 1 your work is at 100%
Command 2 is 200%
command 4 is 400%
To easily move your screen to the image you want to work on alt/option+space bar and Bob's your uncle, momentary hand tool.
Back to 50% and good night!


Morgan - Em/En Space
This tutorial shows you how to em/en spaces and their importance in typography. An em space is a unit of measurement derived from the capital letter M. Then en space is half of an em space. These units are helpful because the space stays proportionate when you change font or point size.
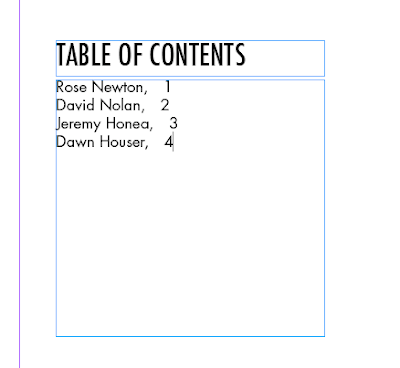
Let's say you're making a table of contents.
To enter the space, go to Type, Insert White Space, and then choose an Em Space or En Space.
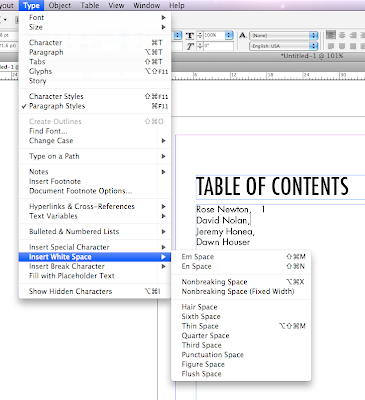
Lets say we chose the Em Space throughout, it would look like:
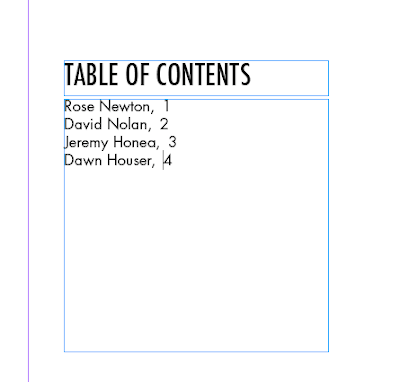
Or, the En space:
Let's say you're making a table of contents.
To enter the space, go to Type, Insert White Space, and then choose an Em Space or En Space.

Lets say we chose the Em Space throughout, it would look like:

Or, the En space:

Simchick - Text Flow

This tutorial will teach you how to make overflow text spill from one box to another. You know you have overflow text when there is a little red plus sign shown at the bottom right corner of your first text box.

Using the black arrow, click on the red plus sign.

Next, move to the text box you want your overflow text to spill into and click.

Your text will now read from the bottom of your first text box to the top of the second text box.
Wednesday, November 3, 2010
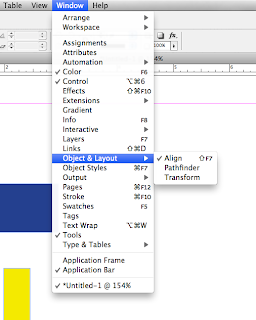
Snider - Align
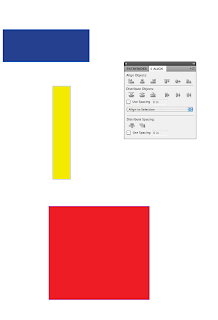
First you need to go to Window>Object&Layout>Align to bring out your align control panel if it isn't out already.
By default, if you now select all three and click on the Align right edges button, all three objects will right align on the
right-most edge. In this case, that belongs to the red object.
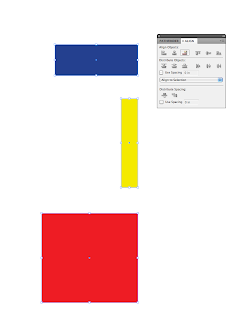
But if you want them to all align on the yellow one that wont work. This is where locking it comes in handy. You can lock the position of your object by clicking it and pressing (command+L)
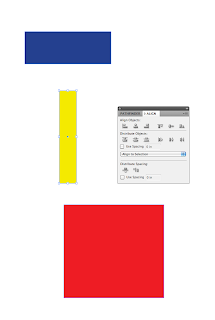
Now when you highlight all of your objects and select the right align tool your object will align to the right edge of the locked object rather than the furthest to the right.
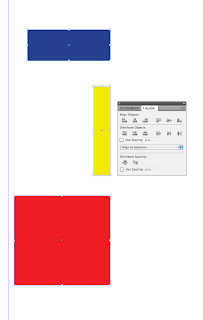
You can unlock the position by pressing (command+option+L)
Happy aligning!
BLOG ASSIGNMENT Week 12: InDesign Tip
BLOG ASSIGNMENT Week 12: InDesign Tip
We have been conducting our InDesign bootcamp this week. We have been covering the basics of InDesign, but as with most pieces of software, there is so much more to learn and discover.
In this blog assignment, share with the class something we didn't cover during the bootcamp. A cool tip, more details about how a tool or a palette works, etc. You will be graded on enlightening the class with something we didn't already know about InDesign.
You must include screenshots or a video of yourself demonstrating this new information.
Note: Some ways to demonstrate software

Post up screen shots/and or video to the blog.
This is not something you can do 5 minutes before class starts. Make sure you allot ample time to document your screenshots.
BLOG IS DUE next THURSDAY 11.11 by class time. Label with (class time, InDesign tip).
We have been conducting our InDesign bootcamp this week. We have been covering the basics of InDesign, but as with most pieces of software, there is so much more to learn and discover.
In this blog assignment, share with the class something we didn't cover during the bootcamp. A cool tip, more details about how a tool or a palette works, etc. You will be graded on enlightening the class with something we didn't already know about InDesign.
You must include screenshots or a video of yourself demonstrating this new information.
Note: Some ways to demonstrate software
- Info on creating screenshots http://www.apple.com/pro/tips/secretcapture.html
- you can set up a flipcam/video camera on a tripod to video too!
- I haven't tried this but you may want to check out http://www.apple.com/downloads/macosx/video/ishowu.html to record video of your screen too.
- If you have Snow Leopard operating system. Quicktime Player will allow you to record your screen.

This is not something you can do 5 minutes before class starts. Make sure you allot ample time to document your screenshots.
BLOG IS DUE next THURSDAY 11.11 by class time. Label with (class time, InDesign tip).
Subscribe to:
Posts (Atom)